
.svg)


Toolbar and Schedule Settings
The schedule toolbar at the top of the calendar includes a wide range of options. In this article we'll get to know it in depth and learn how to use its various functions [from left to right]:
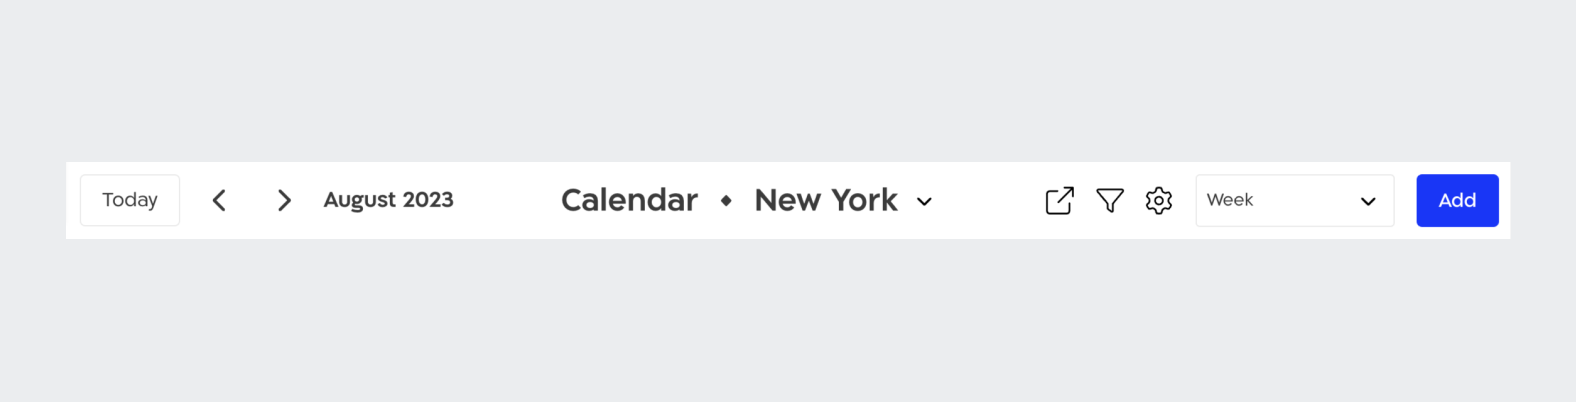
Navigation
Choose between days/weeks/months and quickly jump to the current day.
Branches
If your business consists of several different branches, the branch name will appear next to the word "Calendar". Clicking it will allow switching between their different schedules.
Public Calendar Link
The public calendar link allows your customers and leads to view your schedule on your website. You can share this link on social media, WhatsApp groups, and more. Through the public calendar link, users can register for events in your schedule, pay for them if applicable, and create accounts in your business platform.
Filters
Filter calendar events by staff, event types, categories, spaces, and more. You can apply multiple filters at once. After selecting filters press "Save".
Settings Icon
Here you can add and edit your various events (group sessions, personal appointments, and courses), set registration settings and cancellation policies for the business, mass cancel and restore events, and more.
Views
You have 5 calendar views to choose from, select the view most convenient for your ongoing work.
Schedule settings have a major impact on your clients, so we'll be happy to present them to you in more depth. To access them you need to click the "settings icon" in your calendar and then choose "Schedule Settings":
.png)
You will now be exposed to five different categories - "Registrations", "Updates", "Waiting List", "Appointment Policy", and "Embedding the Calendar on Site". Please enter each one and edit them according to your desires and needs.
Registrations
Class display time for clients
Choose when your clients will be exposed to your schedule via the clients app and website. If you want to expose one week ahead from your schedule to your clients, every Sunday at exactly 8:00 PM, you'll need to edit the setting like this:
.png)
You can leave the setting exactly as it appears by default. In this case your entire schedule will appear at any given moment in your clients app and website.
Class swap
You can allow your trainees to cancel an event they're already registered for, and register instead for another event without charging them an additional payment. Let's say one of your clients canceled their registration within the "Late Cancellation" timeframe (you set what "Late Cancellation" is when you created the different events in your calendar), but you want to allow them to register for another event (the event must be on the same day as the event the client was previously registered for) without charging additional payment. To do so, you need to activate the toggle and choose the timeframe in which the customer can make the swap.
In the following example the clients will be able cancel their registrations and within ten minutes of cancellation, register for another event. There will be no charge or deduction for this procedure.
.png)
Notifications
- Set how much time before an event starts your clients will receive a reminder about it in the clients app. The reminder is sent as a "push" notification (currently cannot be edited).
- The moment they move from the waiting list to the registered list, your customers will receive a push notification to the customer app. If you want to provide them with an additional indication, so they're sure to get the message, choose to activate the toggle and send them an SMS in addition to the push notification.
Waiting List
Entrance from the waiting list
Choose the method by which your clients will move from the waiting list to the booking list. The first option is automatic, meaning clients will be directly moved to the booking list. The second option sends an approval request that clients must respond to within a set time frame (in this example, within 20 minutes). If a client does not respond within that time, their spot will be passed on to the next client on the waiting list.
.png)
Bringing in trainees from waiting list
Choose when the system will stop bringing in customers from the waiting list to the registered list. In the following example, the system will not allow waitlisted customers to move to registered list within one hour of the event start:
.png)
Cancellation times
You can set cancellation times without charge for your customers who come from the waiting list to the registered list. In the following example, we set that customers will be able to cancel their registration up to five minutes after they moved from the waiting list to the registered list, without any charge or deduction:
.png)
Appointment Policy
Unlike group meetings, when adding a personal appointment to the calendar you currently cannot define a cancellation policy. To collectively define cancellation policies for your personal appointments, you need to go into Calendar Settings and choose "Appointment Policy". For this event type as well, you can choose between two ways:
- Allow customers to cancel registration but only within a certain timeframe
- Allow customers to cancel registration at any timeframe, but the cancellation may be considered late.
Limit appointment cancellation time
In the following example we'll demonstrate how to set the first way mentioned above. Customers will be able to cancel the personal appointment at any given moment, but one hour before the appointment starts, the customer app/website will no longer allow them:
.png)
Late cancellation
Note that the toggle next to "Allow late cancellation" in the previous example is inactive. To set the second way mentioned above, you need to activate it. In the example below your customers will be able to cancel their registration for personal appointments at any given moment, but one hour before the appointment starts, the system will charge them a payment/deduction:
.png)
Show cancellation policy in store
If you choose to activate this toggle, your customers will be able to see the business' cancellation policy via the customer app and website right before registering:
.png)
General
Quick view display
Preview your meetings' details and easily mark attendance for customers via Arbox's "Appointment Preview". Click any of your events once and you're on your way! As always, we want the choice to remain in your hands, so you can disable the "Appointment Preview" and go straight to the customer list by turning off the toggle.
.png)
Embedding the schedule on your site
If you've built a personal website for your business or plan to build one in the future, and you want to display your schedule on it, you need to contact the technician who helped you build it and show them the following setting:
.png)
As noted, clicking "Copy" will copy the iframe shown to your computer, and you'll be able to paste it in the intended place "behind the scenes" on the business site. The schedule will appear on the site and update in real time!
.png)
.png)
.png)
.png)


.png)